For immediate assistance please call our support line.
Monday – Friday: Open 8am to 7:30pm Mountain Time
Weekends: Open 9am to 5pm Mountain Time
I have no internet connection
Have you tried turning if off and on again?
The oldest methods are old for a reason; if you can see the network but cannot get internet on any of your devices:
1. Reboot your WiFi router first. This can be done either by unplugging the power cable from the back of the device or from whatever outlet it’s plugged into, or some may have a power button near that same plug.
– Once that is done give it several minutes to boot back up and reconnect, and watch any status lights on the router for anything unusual; if it’s not showing everything after a few minutes, there’s most likely something more going on.
2. You can also also power off and on any devices that seem to be having internet related issues. This could be TV’s, desktop computers, laptops, gaming consoles, so on so forth.
– Please Note: If you notice that one or more devices are not working but others can get online, this typically means that the internet service and the router are fine but that specific device is having an issue; see the next category below.
“I have no WiFi.”
Sometimes you will not even see your network showing up as an option; this can be a little more involved, but the first thing to check is if any of your devices can see the WiFi network.
1. If any devices can, make sure the wireless option for your device is enabled. If it is and you still cannot see the WiFi, something must have changed with that particular device and will need more in-depth troubleshooting.
2. If reboots of the router or that device don’t change anything, it is possible there is a hardware problem; if you can, try to connect to it via ethernet cable to the router directly. If a direct connection works then it has to be something with the wireless hardware and will most likely require a professional eye to diagnose and repair.
“No devices are seeing WiFi.”
1. In some cases, certain router models will have a WiFi toggle button or switch; this will usually not be on the same side as the rest of the buttons and cables, and instead on the top or sides and will always have a label or wireless signal icon nearby. Check to see if toggling that to an “on” state or pressed down once or twice brings the WiFi networks back online; there are typically lights on the router to indicate that as well.
2. Check to see if your router has more than one WiFi network; many will have two or more, usually the second and extras with a “5GHz” label. Some older devices and other exceptions will not be able to see or receive that particular type, so check on phones or tablets that usually can just in case.
“Can I check or reboot the dish?”
If you have done some or even all of the steps above and wish to make sure our dish or antenna should be working, you are welcome to check those if need be; we have a small power brick on the inside of the home that keeps our equipment online and brings the connection to your router.
In some cases there can be errors that only we can see from the office, and a reboot will clear certain active records and logs that may clue us into a problem. We recommend calling us before cycling our equipment if you are experiencing anything particularly intermittent or difficult to locate.
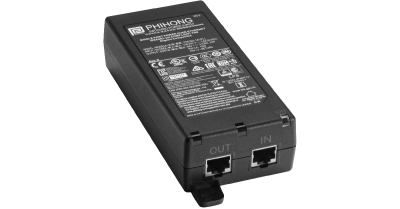
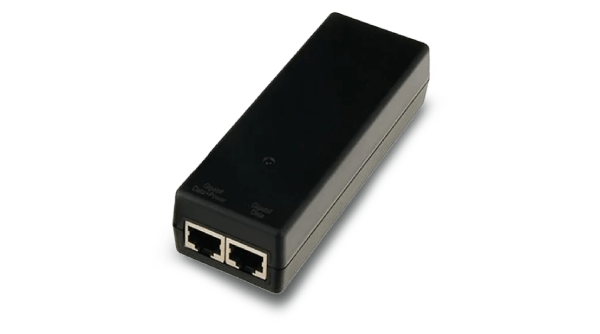
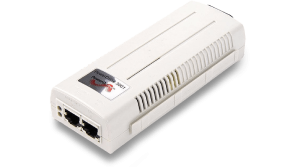
With any of our PoE injectors/power supplies and their paired antenna/dishes that you will see below, the operation for troubleshooting is essentially the same:
1. Check the power itself; all the more recent models will have one or several small solid green status lights if they are plugged in properly.
2. If the power is on, a simple reboot can consist of simply unplugging the power cable itself; it is recommended to wait until the lights fade before reconnecting that line. Otherwise, if need be, you can also unplug the ethernet cable heading outside for a few seconds and reconnecting it while ensuring you feel/hear the plug click back in; if it doesn’t, that may be part of the issue.
3. Make sure the cables haven’t been switched around by accident; it sounds obvious, but we get calls every so often about something on site such as pets or children playing near where the router is located.
– The cable from the dish outside needs to be going into the port on our device labeled one of the following, in order of most recent: Out, POE, or 15W 30V Gigabit Data+Power.
– The port that your router should be connected to will be: In, LAN, or Gigabit Data.
*There are some long-time users that may see different devices from older equipment versions, those will be included below for reference.*
Still no internet?
If you are unable to connect after rebooting your power supply and personal router, we strongly suggest you contact our support team for further assistance. You can either call one of the numbers listed at the top or bottom of the page, or use the contact form to notify our technicians of your issue.
Otherwise, if it happens to be after hours or you wish to try one last thing before you reach out, we recommend attempting a Factory Reset of the router.
This is typically the last resort: this will not help if a router has malfunctioning hardware from age or physical damage from water or a power surge to the home. This is strictly in the possibility of a software problem and if this does not work and we are online you will likely need to replace the device entirely. Doing this improperly can prolong issues. Do this at your own risk.
1. Every router has a button or a pin-hole button that you will need a paperclip or something narrow to reach it on the bottom or back of the device, and should usually be highlighted red and/or say “reset” next to it.
2. While leaving the device powered on, hold in that button for 15-30 seconds before releasing it; you should see the lights on the device change or shift, and it will begin to reboot several times in a row.
3. Once it stops cycling, you will need to look for the WiFi network showing up on your devices once more. If a proper reset took, it will have reverted ALL available settings such as if the WiFi name and password was changed. The default name and password should be located on the router labels, typically on the bottom.
4a. If you have the router brand app or wish to use it from now on, find or download that on your smartphone first, preferably on the person’s phone who should be managing the router in the future; once that is done connect to the WiFi and launch that app and it should detect the router as a new device. Follow the steps it gives you and if the device is functioning properly again you be online as soon as that is complete.
4b. OR: If you do not wish to use the app, connect to the WiFi with a computer or tablet instead and load your preferred internet browser. Go to the address bar and enter “192.168.1.1”. This will work for the vast majority of routers on the market, and should bring you directly to a router interface page where it prompts you to begin the setup, and just like the app follow those steps until the device is back online.
-You will often come immediately to a page prompting you to download the app instead; for any besides a select few systems, there will be an option near the bottom of the page to proceed on the browser.
–Most current mesh router systems such as the Amazon eero, Netgear Orbi, or any similar type will require setup through their specific app. We have no control over this.
New Equipment, No Connection
I have a new router
Currently, Kellin operates with an authentication system which requires us to manually authorize every device that is plugged directly into our network. What this means is that anytime you get a new router, you need to contact our support team and notify them of the change. Once we have authenticated your new router on the network, you can proceed with the automatic DHCP setup. As always, if you have questions or are unsure how to proceed, please contact us.
-Some routers support Mac address cloning. While we only recommend this for advanced users you may be able to clone your previous devices mac address to bypass the need to call in. This can be done at any time.
I am a new customer and need to do the first time setup.
1. Connect the new device to the ethernet input; on most routers that will be labeled “Internet” or “WAN”. Once that is done, contact our office.
2. If this is an older router you will be able to get online almost immediately. If this is a new router you will then be able to resume with the setup.
I have a new device I am trying to hook up to WiFi, but forgot my password!
Since we do not own or maintain the router in your home, we do not have access to the WiFi password and network name needed to connect your new devices. If you have misplaced this information, you can find it by logging into the configuration page for your router. Every residential grade router has a configuration page accessible through a browser currently connected to your network. You will have to consult your router’s manufacturer for instructions on how to obtain your lost information as every router is different based on the make and model.
*If you are in an area with poor cell service without the WiFi, please remember to give us a call before removing your previous router or network device; we will be able to actively watch for the incoming change from our end as long as we know to look for it!
Setting up your Kellin.net email
In the table below, you will find all the account information needed to setup your mail client. You should be able to use any mail client you wish as long as the settings are entered correctly. Basic configuration guides are listed below for the Apple and Windows built in ‘Mail’ clients.
| Account Type | POP3 |
|---|---|
| Incoming Server | mail.kellin.net Port 995 |
| Outgoing Server | mail.kellin.net Port 465 |
| Username | your_email@kellin.net |
| Password | your_password |
| Account Type | IMAP |
|---|---|
| Incoming Server | mail.kellin.net Port 995 |
| Outgoing Server | mail.kellin.net Port 465 |
| Username | your_email@kellin.net |
| Password | your_password |
Apple Mail desktop setup
1. Open the Mail application by clicking on the Mail icon from the DOCK.
2. On the task bar at the top left section of your screen, click on the Mail dropdown and choose the option Add Accounts.
3. A dialog window will pop up asking you to Choose a mail account to add. Selected the radial next to Add Other Mail Account, then hit continue.
4. In the Full Name field, enter your name as you wish to be displayed on your sent mail. In the Email Address field, enter your full @kellin.net email address. In the Password field, enter your private password. When completed, hit continue. The mail application will try and fail to configure the settings automatically. You will be prompted with a message that says Account must be configured manually. Just hit next to continue with the setup.
5. Now you should be prompted with a window that says Incoming Mail Server Info. For Account Type, select POP. For Mail Server, enter mail.kellin.net. For User Name, enter your full @kellin.net email address. For Password, enter your private email password. When finished hit continue. The form will attempt to sign-in and authenticate. If you receive any errors, review the fields you have entered or contact Kellin Support.
6. Now you should be prompted with a window that says Outgoing Mail Server Info. For SMTP Server, enter mail.kellin.net. For User Name, enter your full @kellin.net email address again. Fill in the Password field as well. Hit continue when finished.
7. Setup should now be complete. You might get a message prompt regarding a security certificate, just hit ‘continue’ or ‘allow’ to verify the connection to the kellin.net mail server.
Windows Mail desktop setup
1. Open the Mail client. You will find the Mail client by going to the start menu and clicking on ‘All apps’.
2. Click on the settings button at the bottom left corner of the App; the settings button is the one that looks like a cog gear. A slide out menu will appear on the right side of the app, click on the link that says Manage Accounts.
3. Now click on the link to + Add Accounts
4. A dialog window will appear asking you to Choose An Account. Scroll down on the window untill you see Advanced Setup; click on that option.
5. You will be given two options in the next window, click on the link for Internet Email
6. In the Account name field, Type ‘Kellin Email’.
7. Fill out the Your Name field with your full name as you wish to be displayed on your sent emails.
8. For Incoming Server, type: mail.kellin.net
9. For Account Type, select: POP3
10. Fill out the Email Address field with your @kellin.net email address.
11. In the User name field, type in your @kellin.net emaill address again.
12. Fill out the Password field with your private password.
13. In the Outgoing SMTP email server field, type: mail.kellin.net
14. Make sure the boxes are checked for “Outgoing server requires authentication” and “Use the same user name and password for sending email”. Un-check the boxes that next to require SSL for incoming and outing email.
15. Click on Sign In. Your Setup is now complete!


